
sphere00.ppm |

sphere01.ppm |

sphere02.ppm |

sphere03.ppm |

sphere04.ppm |

sphere05.ppm |

sphere06.ppm |

sphere07.ppm |

sphere08.ppm |

sphere09.ppm |

sphere10.ppm |

sphere12.ppm |
This clock value can be utilized in many ways within the source file in order to do animations or modify characteristics in the ray traced image. Consider the following examples:
| POV-Ray Command | Explanation |
|---|---|
|
sphere { <0,0,0>, 3.0 + 0.5 * clock} | This would cause the radius of a sphere to get bigger by 0.5 times the clock value. |
|
sphere { <0,0,0>, 3.0 pigment { color rgbf < 0.0 + 0.1*clock, 0, 0, 0> } } | This would cause the color of the sphere to get redder by 0.1 times the clock value. |
|
sphere { <0,0,0>, 3.0 translate < 0, 3 * (sin(radians(30*clock)), 0> } | This will cause the sphere to move up and down in the y direction depending upon sine of the angle defined as the clock value multiplied by 30 degrees. Note the use of a function to convert the angle into radians. |
|
camera { location <0, 5, -10> look_at <0, 0, 0> rotate <0, 30*clock, 0> } | This will cause the camera to rotate 30 degrees times the clock value |
The simple povray script we have used before can be easily modified
to include a
clock variable that can be added to the outfile name. Look carefully at
the following script to see how it is done:
Example Script:
clockpov
x-povray -I$1.pov +V +D0 +P +X100 +FP16 +O$1$2.ppm +K$2If the above script is called with the following arguments:
|
sphere00.ppm |
sphere01.ppm |
sphere02.ppm |
sphere03.ppm |
|
sphere04.ppm |
sphere05.ppm |
sphere06.ppm |
sphere07.ppm |
|
sphere08.ppm |
sphere09.ppm |
sphere10.ppm |
sphere12.ppm |
 This will take all of the source frames and will make them into one
animated GIF image called animatespheres.gif. The -delay 20
argument will cause a 20 hundredths of a second delay between each frame,
and the -loop 0 will cause the gif to loop over and over again.
This will take all of the source frames and will make them into one
animated GIF image called animatespheres.gif. The -delay 20
argument will cause a 20 hundredths of a second delay between each frame,
and the -loop 0 will cause the gif to loop over and over again.
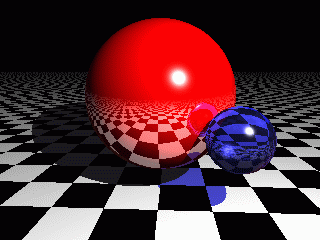
Click on the image to the right to see it animate. This sequence has used many of the above concepts including a rotating camera, the moving red sphere that goes up and down, and the changing color of the translucent sphere as it goes from blue to clear. Twelve frames were used to make the animation. The source code is listed below.
For instance, the following code shows how to use conditional actions for the povray clock variable using the #if and #else statements so that the sphere is drawn one way when the clock is less than 5, and another way the rest of the time. The code must also have the #end statement to show the parser where the statements belonging to the conditional stop and other normal statements continue. This code also shows how to define a new variable with #declare. In this case, we have created something called XShift that we use to translate or shift along the x-axis that only happens when the clock exceeds the value of 5 in the example below.
#if (clock < 5)
  sphere { < 0, clock * 0.1, 0 >, 1 }

#else
  sphere { < 0, clock * 0.5, 0 >, 1 }
  #declare XShift = (clock - 5) * 0.1
  translate < XShift, 0, 0 >

#end
In the povray31 directory, there are a number of other useful files as well as a directory full of povray scenes with source code in case you want to see how some other effects are done. Seeing how others have done something is a great way to learn new skills that you can then apply in your own creative way.