Animated Three-D Graphic Scene
by D.W. Hyatt
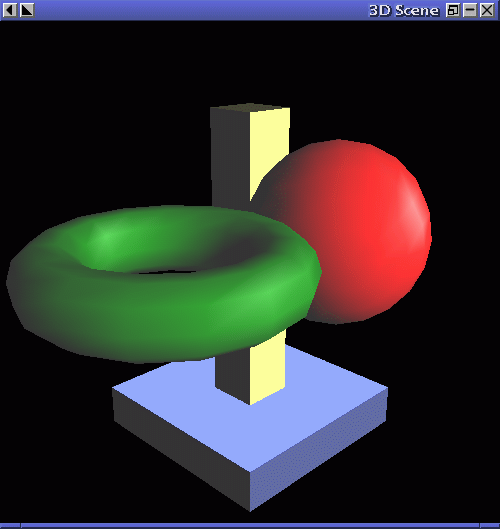
Using Basic GLUT Solids
 Although in basic OpenGL all 3D objects are created from simple
polygon regions, there are a number of basic solid types provided by
the GLUT Library. Among them are:
Although in basic OpenGL all 3D objects are created from simple
polygon regions, there are a number of basic solid types provided by
the GLUT Library. Among them are:
- glutSolidSphere()
- glutSolidCube()
- glutSolidCone()
- glutSolidTorus()
- glutSolidTeapot()
These are actually complex sets of commands that include the generation
of the triangles that form the surface of the objects as well as the
calculation of normal vectors that are used for lighting. For our
first program involving 3D visualization, we will use these basic
objects. Use your textbook on OpenGL to refer to the required parameters
for these basic objects.
Using Transformations
There are three main transormations that we will use to modify the
objects in our scene. Usually, these transformations are used in
conjunction with glPushMatrix() and glPopMatrix()
in order to isolate
complex movements. The basic transformation functions are:
- glRotatef(degrees, x-axis, y-axis, z-axis)
This command will rotate the point of view a certain number of
degrees around the specified axis. Usually a 1.0 is placed for the axis around which the programmer wishes to rotate, with values of 0.0 for the other axes.
- glTranslatef(x-distance, y-distance, z-distance)
This moves the point of view the proper distance in the specified directions.
A value of 0.0 is used for any dimensions where no movement along the axis
is desired, yet
any appropriate floating point value can be used for the other dimensions.
- glScalef(x-amount, y-amount, z-amount)
This enlarges (or shrinks) the specified dimension. To keep one of the original
dimensions the same, it is necessary to make the parameter a value of 1.0, and
then values above 1.0 will elongate, whereas numbers less than 1.0 will shrink
the dimension.
Animation and Double Buffering
In order to create an animation, the objects in a scene must be erased
and then redrawn. If were not for some advanced techniques, the animation
would seem very choppy since as soon as one frame in the animation is
drawn, the entire scene must be erased and then redrawn with the objects
in the next position. This creates a very choppy animation because most
of the scene is incomplete as each frame is displayed.
The technique known as Double Buffering allows for a smoother animation
because two areas of display memory are used instead of one. As the
viewer is observing one frame of the animation, the other display memory
area that is not visable is used to create the next frame. Any images
on that frame are erased, and the objects are redrawn. As soon as the
frame is complete, the command glutSwapBuffers() is called and the new
area of memory becomes the visable screen.
Properties of Light
In the real world, there are not really three types of light to consider,
but in order to generate a realistic scene in computer graphics, people
usually play around with three separate terms, ambient,
diffuse, and specular light. By adjusting these
three values, various effects can be achieved. Each of these light properties
are expressed as four-component vectors in the form RGBA which means that
the first three components control the amount of Red, Green, and Blue light
coming from the source. The fourth or Alpha component is used for
deciding how multiple light sources interract, and is typically
given a value of 1.0 in simple models.
- Ambient Light - GL_AMBIENT
Ambient light is the general light in the
room that seems to come from nowhere. It is actually the light that
bounces off the various surfaces in the room such that even though
the back of an object may not be in direct line of the light source,
it is not entirely black but still reflects some light.
- Diffuse Light - GL_DIFFUSE
Diffuse light is the general directional light
provided by such a light source as the flourescent lights in a room. It
comes from one direction, and will cast shadows, but it does not reflect
sharply. If a surface is perpendicular to the light source it will be
brightly lit, whereas if the light hits the surface at an angle it will
be less strongly lit.
- Specular Light - GL_SPECULAR
Specular light refers to light that comes from
a specific direction but reflects well in another direction. A flashlight
beam that reflects off of a shiny surface is an example of specular light.
A glass bottle with strong highlights would be highly specular.
Normal Vectors
In order to determine how much light will be reflected from objects in a
scene, the objects are divided up into small polygon regions and the
normal vector, a directional vector perpendicular to the surface, is
calculated. The angle between the normal vector and the light source
is calculated for each polygon, and then degree of lighting is determined
by the rendering machine. If the light is directly overhead and the
normal points in the direction of the light, the full value is applied.
If the light is at an angle to the normal, less lighting is rendered.
If the light is at a 90 degree angle or the vector points away from
the light source, this polygon will be in the shadows and will thus
be drawn with a darker color. We will discuss normal vectors in more
detail later, but if you want to look ahead, the web page on
3-D Lighting and Surface Normals.
Fortunately, the predefined objects used in this first 3D program
already have their normal vectors calculated, so there is no need to
take this into consideration. We will calculate our own normals
in the next program when we generate a 3D surface.
Material Properties
Materials need to have their properties defined much as the light sources do.
These properties can be defined for each face and may be applied or removed
from specific objects drawn in the scene through the use of glPushMatrix()
and glPopMatrix() functions. In this example, the properies are defined
at the beginning and apply to all objects in the scene. For most objects
the ambient and diffuse parameters would have the same values, but the
specular property could be adjusted to make objects look shiny with
strong reflections.
The Source Code
Take a look at the source code: scene.c
Your Assignment
Your first assignment in this unit will be to create a simple scene
of 3D objects, and then use mouse or keyboard routines to navigate
through it in some way. Be creative, be original. Be sure you include
your own comments in the source code of your program to explain different
portions of your design. Everyone's program in this class should be
diferent.